Wednesday, August 31, 2011

Babiekins

I just found the cutest magazine!

It is like a modern-DIY-trendy-all about kids-inspirational ANYTHING creative website-magazine-blog all in one place!  I better be careful or I will lose track of time looking through everything.

This picture is the first that comes up, and that little boys hair drew me in...
So cute.


I subscribed to their site and can't wait to start getting cute emails.  I already checked out their blog, the magazine's current issue, and I am thoroughly amazed at how far they have come in only a year!

Here's to creativity hitting main stream!

                                                         Cheers,


Thursday, August 11, 2011

Daddy's Shirt to Sassy Skirt

We are big at recycling around here. And I am not just talking about soda cans, plastic bottles and the occasional battery.  Do you remember last year when I posted about Little Gal's up-cycled wardrobe?  Well it is that time again that our closets are being cleaned out.  I can't help but look at each item in our good will pile and wonder "what can I make out of that"?

These are a few of Mr. Pepper's shirts that I decided to keep and work with...
I was excited for the bold stripes and plaids!


Simple Sassy Skirt

You will need:
Pinking sheers
Sewing machine
Thread
3/4 or 5/8 inch elastic
Giant safety pin
Hot Iron
Old button up Men's shirt


1. Start with one of Daddy's shirts!
Make sure you button it up all of the way and lay it flat.


2. Cut the shirt straight across, just below the pocket for a shorter length, or just below the armpits for a longer length!  My best rule...whatever length you want to end up with, cut an extra 1 1/2 inches above that.


3. Sew the shirt together where it buttons down.  I sew once it on each side of the buttons.


You can be tricky like me and just slide the button right over your sewing foot as you slowly sew along.


4. Now, cut off the top button if it is more than 3 inches from the top of your pinked fabric.


Steps 5-9 have no pictures so read carefully.
5. This is a simple traditional elastic waistband.  (You will make a casing for the elastic and then pull the elastic through with a giant safety pin.)  Fold the fabric inward 1/4 inch all of the way around and press it to get a nice crease.  Fold fabric again, this time one inch all the way around, press all the way around or pin it every 2 inches or so.  Sew it leaving a 2-3 inch gap from where you started.  You now have a casing around your skirt with an opening to insert your elastic.

6. Measure elastic snugly around waist adding one inch.

7. Insert elastic into casing.  I do this the traditional way by attaching a giant safety pin to one end of my elastic.  Insert safety pin and continue to thread the elastic all of the way through.  Make sure that your elastic doesn't go all of the way in, you need elastic left out on both sides of your opening to attach them.

8. Remove your giant safety pin and sew both ends of your elastic together.  Overlap the elastic by one inch and zig zag from top to bottom, or sew a large "X" covering the 1 inch gap.

9. Fold fabric opening over and matching up your seams, sew it closed!  You can then adjust the shirred fabric evenly around the elastic.  I like to sew a small piece of ribbon to the back of the skirt like a tag.


We had lots of fun taking pictures!


Don't forget to be creative!  Use your extra fabric for ruffles... 


Or you can even use cuffs for pockets! 


Are you inspired by your own Good Will Pile???

                                                                      Cheers, 


Thursday, July 14, 2011

Coasters for every age!

We made these for a fun family craft project for the 4th of July.
Super easy, and any age can participate!  We had coasters designed by a 5 year old all the way up to an age I am not allowed to share.  You really will love how unique yours turn out!

All you need is:
Tiles - we used Travertine tiles that were 4 x 4 inches in size
Felt - for the back of the tiles
Acrylic or Craft Paint
Sealer/Varnish - you can even use Mod Podge to seal them


What to do:
1. Design and paint your tiles!
2. Let them dry
3. Use your craft glue and attach a felt square cut to size to the back of each tile, you don't want to scratch your favorite piece of refinished furniture do you?
4. Seal the tiles with a varnish or sealer like Mod Podge
5. For an extra little fun, sign and date the back of your creation!


What's your favorite beverage?

                                                                 Cheers,


Tuesday, June 21, 2011

Splash of Color!

Renting has its perks...especially in California.  No worries about HOA dues, maintenance or big fix-it problems.  That is what our landlord is for!  White walls on the other hand are so boring and drab.

When I was looking through the pictures of little Gal's room, I really noticed the white for some reason.
Don't they look sad?  I thought to myself..."I might as well just paint a frowny face on the wall!"  Sniff sniff.


Then one minute later I thought...
"Why not paint SOMETHING on the walls?"
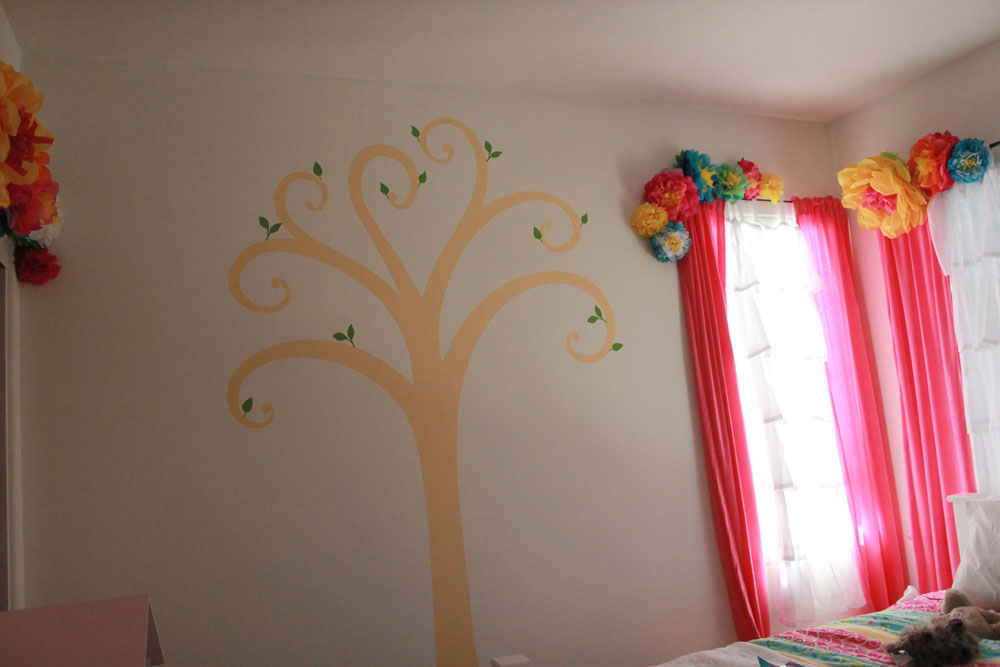
It wouldn't take as much time to paint an image, and I can easily paint over it if the need comes to move sooner than expected!  And what goes better with birds and flowers than tree's?

Behold...a single, yellow, swirly tree.


Then add a few vinyl leaves cut from my cricut machine.


Well...maybe just a few more leaves...


And some falling off to the side might be cute...


Okay.  Maybe a birdhouse, or a birdcage.  Well, let's add both!


Little Gal loved helping me put the leaves and birds on the branches so much
that we decided to add some on the other walls too!


I love it!  She loves it!  We all love it!

And now, our summer has begun!  I am ready for swimming, lounging, and beach going!
Check back every once in a while through the summer for more fun crafts and projects.

                                                                 Cheers,


Friday, May 6, 2011

Little Gal's Dresser

A while back, I saw this amazing blog post on How to Glaze furniture by Show and Tell.  Just the word "Glaze" made me want to try it, and she made it look so easy!  So... I tried it.  And it worked!  It was fun, and messy, and forgiving.  Just my type of project.

This was Little Gal's dresser before the revamp.  Lucky for me it was unfinished solid wood.
That meant easy and light sanding.


After I scuffed up the surface a bit, I drew some swirly branches onto the dresser drawers in pencil.


I got so anxious, that I just started painting right away.  The effect was so neat!  The bare wood added one more dimension to the swirly tree branches, which I originally wanted to paint white.  I decided I would leave them bare!


After the painting, I distressed the dresser.  I used heavy grit sand paper and roughed up corners and edges, bringing out wood tones all over the dresser.  Then came the glazing!  Go and read Show and Tell's post here for detailed instructions.  My favorite thing about the glaze was how it settled into every scratch and hole.


I varnished it with 2 quick coats and then let the dresser cure for 2 days.
After the painting, sanding, glazing and curing we moved it into Little Gal's room!


It was Little Gal's idea to embellish the dresser with vinyl stickers!


And we found these adorable crystal knobs on Ebay.


It was an adorable addition to her bright room!


                                                                  Cheers,