Thursday, August 26, 2010

FREE Photo Op(tions)

This is for all of you out there who want the secrets of professional photographers to use for your own benefit. There are sooooo many websites out there offering tips and tutorials on photography, but you MUST check out Coffee Tea Photography! It is my absolute favorite.

This little tidbit I am about to share is for those of you that are familiar with Photoshop orPhotoshop Elements. You are most likely wasting a little time if you know nothing of actions. Actions are preset editing options that do the work for you! They save time, and make it possibly to change a photo's complete look quickly. This action below is called Vivid2 and is FREE on Coffee Tea Photography. I love it because once installed, and clicked upon, it transforms your photo into 5 options! original, soft, vivid, urban, and bright.
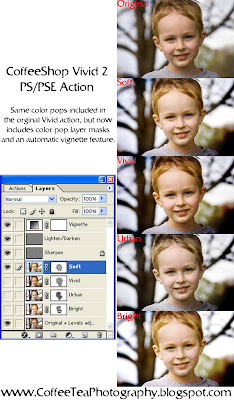

This is what happened to my photo when I used the action Vivid2!

Original

Soft

Vivid

Urban (my Faaaavorite of my favorites)

Bright

If you know nothing about editing photo's, know this: Every "photographer" edits their photos. Whether it be cropping, lightening, photo shopping, changing to black and white...there are millions of options, and they probably used at least one.

Go to and edit your little heart out!

Oh! P.S.
Coffee Tea Photography also has instructions here on how to install the actions! Please use the instructions so you don't have to get frustrated like I did.

Cheers,


Thursday, August 19, 2010

Can't wait any longer!


I have so many things that I am wanting to post about this week. But all I can do is love on my new buffet. Given to me by my dear friend "Lee", who found it on craigslist.org for a fantastic price of FREE!

Lee is my thriftiest of friends, and my new buffet was my most favorite birthday present.

The gift...


A broken leg was fixed via "Lee's" other half, and sanded to perfection by my better half. :)
It was definitely a labor of love because I absolutely HATE sanding.

What I did:
Primed
Lightly Sanded
Painted
Lightly Sanded
Roughed up the edges with gritty sand paper
"stained" the rough spots
Varnish varnish varnish...

Hardest part - I then let my present cure for 3 days. Waiting to put it in the house was torture.
Now it is happily in my entryway brightening everything up!

I had to take a picture at night while things were tidy and the 3 little ones were in sleepy land.
This color below is more correct of what it looks like in person.


Are you now craving a refinishing project?
Send pictures of your projects to thesassypepper@gmail.com so we can do a little show and tell!

Sassy and I love to be inspired!


Cheers,


Tuesday, August 10, 2010

A New Kind of Birthday Banner!

Not to use any excuses, but my last blog was almost 3 weeks ago due to:

Lil' Gal's Birthday
My Birthday
Summer Vacations out of state
3 kids against 1 parent

I will have you know that I am back in the Blogging Saddle and ready to post!

In honor of my Lil' Gal's birthday this year which was a WIZARD of OZ theme, (Don't worry, you will see a LOT of pictures) I made her a "Sweets" banner to hang above the Lollipop Shop we set up in our living room.


Made with love with paper, glue, ribbon and adorable cupcake and ice cream cut-outs using my friends Cri-cut machine! I have also decided that a Cri-cut machine is a necessity and I would like my husband to retrieve on Black Friday this year.

All but maybe 30 pieces of candy were taken by the party goers.
Their parents were grateful I am sure. :)

Cheers,

Wednesday, July 21, 2010

Any Questions?

First, I have to tell you Sassy that we are sooooo not lame. It just happens that between the 2 of us are 4 children. By the way, I am making a toilet paper creation, and I can't wait to see people's faces when I tell them I saved toilet paper rolls for months to make art.

Any time we post a tutorial, I wonder if the project went smoothly for the crafty readers that try it out. Did they get frustrated? Was there a little bit of trouble-shooting? Did they have any questions? Two readers sent some great questions recently, and I thought I would share their answer with everyone!

Question #1 comes from Olya who asked about the Melted Edge Flower tutorial:

"Just made a couple... they are adorable... I love trying out different fabrics for this :-). a few little fabric samples that I got didn't work well for this idea, but now I know better... would you have any recommendations for techniques to use to prevent the edges from coming out so dark? the flowers in the pictures do not appear to have burnt edges, but mine come out burnt or dark, especially with the Shantung polyester "silk"... what should I do? "

Yes Olya, you can achieve the look with out burnt or super dark edges. First, you might try turning the heat down a tad to see if that helps. A larger flame will "melt" more of the fabric at once, causing a darker edge. Also, Silk fabrics work great and the darker the color, the less you will notice a darkened edge. If you have fabric that you REALLY want to use, but isn't melting right, or is made of cotton, you can fray the edges for a fabulously vintage look. I hope your fabric and flowers turn out Amazing!

Question #2 comes from Angie who asked about the Mod Podge canvas Tutorial:

"On the mod podge project would it work with a 12 x 12 photo??"

Yes it will work on a photo! But you have to be careful. You can't use a photo printed from your computer onto photo paper. You have to use a photograph that has been printed from a lab. Even Costco one hour would work! If you try a photo printed from home, you will probably end up with smeared ink. Please send pictures of your finished project! We would love to see it!

Thank you for your questions! Keep 'em coming!

Cheers,

Thursday, July 15, 2010

Man, we are LAME!

First off, Pepper and I realize we have been entirely lame and that this blog has been very much neglected during the past several weeks. We're sorry we've sucked and want you to know we are jumping back on the blog wagon!

Or off the wagon, or however that saying goes.

So I'm here to tell you I have a project in the works. A friend of mine has inspired me with her TP wall art!

Oh yes, TP as in toilet paper. Yes, ma'am.

Since the only people in this house who currently use toilet paper are me and my husband, I figured it would take a while to save up enough TP rolls to make the project I have in mind. It has.

For the past 6 weeks I have been saving TP rolls and empty paper towel rolls. I think I finally have enough to get a move on this project!

Keep your eyes peeled for a new post this weekend. I have yet to buy spray paint and wall mount squares but this is happening. people!

"I love that I suck!" (name that movie),

Thursday, July 1, 2010

Poof it up!

I just can't get this little idea out of my head for a 4th of July banner! It makes me so sad that we are leaving out of town before I have had to chance to whip it together. I thought I might share the idea in hopes someone might try something similar.

Tiny puff balls hung under a banner that reads:
"One Nation under God".
Now I have it documented so that hopefully I can make it next year.
If anyone attempts, please send pictures!


Last week I finally crossed these little pink puffs off my list. Sassy made me excited about decorating with tissue puff balls just 2 months ago. I can hardly believe that it took me this long to finally implement Sassy's cute (and awesomely EASY) idea in little Gal's room.

I made the edges rounded because I love that they remind me of Hydrangeas.


I think I might add more of them! Maybe even a little puff of yellow or lavender. :)
I am glad they are easy and made from paper because I tend to change my mind often.

I wish you all a safe and lovely 4th of July holiday.
God Bless our troops!

Cheers,


Tuesday, June 29, 2010

Tea Party Plates!

Did you read my tutorial on E-6000 adhesive and how to make a fabulously cute candy dish or cake stand? Did any of you make a cute candy dish or cake stand?
If you have yet to try out E-6000 adhesive, here is yet another choice for you...

The Tea Cup Treat Stand
Who said tea cups are only for tea?
I discovered these mix and match plates and tea cups at a goodwill store.
Total, all three stands cost me about $8.00 total, glue included!
I purposely looked for cups and plates of all different sizes to add more variety.


The salad sized stand will hold kiddie sized treats for the many tea party's that my two daughters like to plan with me. Perfect for tiny cookies and snacks.


The upside down tea cup stand will be perfect for taller treats like cupcakes or cake pops! I adhered the cup to the large bottom plate first. Once dried over night, I added the salad sized plate on top!


The double tea cup stand! I think this one is my favorite. I adhered the cups together first. Once dried I added them onto the bottom larger plate and decided to use a bowl for the top. Not only can it hold treats, but also butter or jam to spread on rolls in the top bowl!


Little Gal and her sister think I am ready for a party.
Tea anyone?

Don't be shy with your creations.
This project is proof that one lady's junk is another lady's treasure!

Cheers,