
This is what your finished product can look like!
Darling of course, and the perfect gift for those Grandmas and Grandpas, or even yourself!

Mod Podge Photo Tutorial:
Part I
You can also look back to Sassy's mod podge tutorial for the original instructions.
What you will need:
Pre-stretched canvas
Paper cutter  or scissors
or scissors
Cute paper pre-cut to fit the sides of your canvas
Cute photo's
Two (2) - Paint Brushes or Sponge Brushes
Wax Paper

towel
Acrylic/Craft Paint
Acrylic/Craft Paint

Step 1: Apply a thin coat of mod podge to your entire canvas, sides included.

Step 2: Have your strips ready? If not, cut them to fit on each canvas side while the Mod Podge is drying. My strips were 1/8 of a inch smaller that my measured sides.

Once Mod Podge is Dry, you will re-paint an additional thin layer on one side of your canvas.

I wanted to make sure that my edges would stick, and stick well. So you have an optional step of applying a thin layer of Mod Podge to each strip.

Step 3: Place your strip of paper along the edge of your canvas. Smooth it over with your fingers several times making sure no bubbles form. Repeat step 3 with all sides.

Your edges don't have to meet up exactly together.
You can cover the exposed canvas with paint in a few more steps.

Step 4: Photo Application
If you didn't already tear off a large piece of wax paper, DO IT NOW! Good job.
You will use the wax paper again in a few steps.
You will use the wax paper again in a few steps.
I also pre-cut my photo 1/8 inch on each size so that there was no edge overlap.

Place the photo down onto wax paper and apply a good amount of mod podge to the back of your photo. The photo paper is thick enough that it won't pucker or bubble at all.

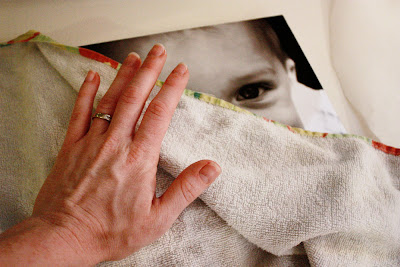
Step 5: Turn the photo over and smooth it onto your canvas.
You can cover the image with a soft towel to do the smoothing. It is easier to smooth a photo onto the canvas with something on top to keep front jerky movements.
Wait about 20 minutes for Mod Podge to dry.
Step 6: Mod Podge the front of the photo. It will look milky white, but remember it dries clear.

The photo on the left is almost dry, the photo on the right was just Mod Podged.
It will take about 20 minutes again for Mod Podge to dry.

Step 7: Dry Brush (or sponge) Paint Application.
You can use any dry brush or sponge. Make sure the brush or sponge is DRY to get that vintage look. Dip the brush in a small amount of paint, and before you start to apply, wipe your sponge/brush on a paper plate or paper towel so you use a minimal amount. Then dab your sponge/brush along the edge repeatedly until it is as dark as you want.

Voila!


After your photo's look complete, you will want them to dry fully over night. Place your photo canvases face down on your wax paper onto a flat surface. I also like to cover the back of my canvas with heavy books that will press my photo to the canvas even more overnight, this will helps minimize any bubbles or puckering.
Done! You did great! But wait...there's more. ;)
Mod Podge Photo's on Canvas
Part II
What you will need:
Mod Podged Photo's on Canvas


Step 1: Put your canvases in order the way you want them to look on your wall. Also, decide how far apart you want them to be {1 inch, 2 inches...etc}. Multiply that number by 4. Measure your ribbon out to that length. Cut as many as you need for holding up canvases below. For three Canvases you will need four ribbons in this length.
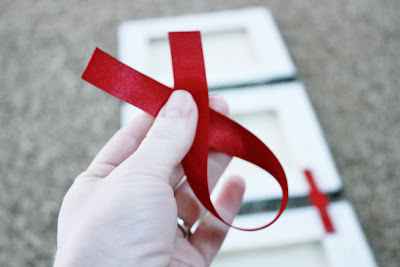
Step 2: Get your ribbon ready to staple.
I like to fold my ribbon with about 1 inch overlap. The double strand will give the ribbon more strength when holding up another photo canvas below.
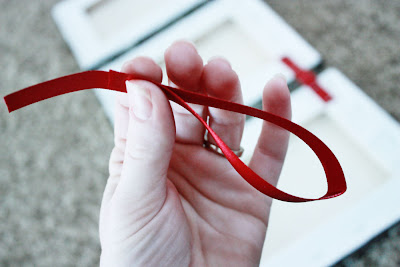
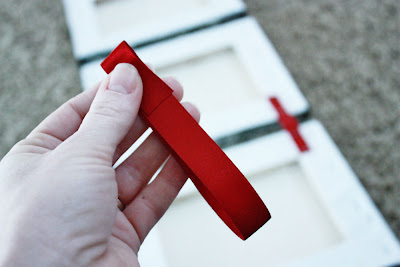
Step 3: Staple your ribbon to your canvas.
I stapled my ribbon 1 inch in from the edge of my canvas.
I used two Staples on top and on bottom for additional strength. Repeat as needed.

Step 4: The Top
I unraveled my ribbon first to "eyeball" how long I wanted it to be.
Then I cut double that length again for extra strength. Hey, that rhymes!

Stretch your ribbon flat, and then fold it over the the other side.
Again, I wanted my ribbon 1 inch from the edge.

Step 5: Staple your ribbon.
I used two staples on each side because I am paranoid.

Now you can hang your finished product! All you need is one cute hook or nail!

Who will you be giving your photo canvas gift to?
Cheers,

67 comments:
This is what I wanted to do with the kids pictures. When can we do it? I like the idea of the ribbon too!
These are awesome - love the treatment you did on the edges!
What a FANTASTIC tutorial! Thanks for sharing I can't wait to try it out! ♥ DavesWife p.s. I am a new follower!
Thank you for putting up a tutorial! Love this idea!!
Quick question-I got confused around the wax paper part. I understand that you put the photo face down on the wax paper, then apply Mod Podge to the back of the photo and let it dry for 20 minutes. Then it says to cover the front of the picture and smooth it onto the canvas.
After the 20 minutes of drying, is the mod podge still sticky enough to keep it on the canvas? I am guessing that it is sticky enough to keep it on and then you do the coating over the top to secure it in...correct?
Sorry for being so wordy! Just want to have all the info before I start the project!! Thanks for your time!!
luv this art project- and what a wonderful gift for christmas...thank you for sharing. simply amazing
rossane
this is great! I have't played with paper for over a year now since I turned to digi scrapping, but this looks like fun!!!
Thank you for sharing the 'how to' here - I was linked to you from Hummie's World!
Bernie x
I love this idea! What kind of paper was your photo printed on?
I'm really excited about trying this!! Is the wax paper found in the aluminum foil isle? Or is this a different kind of wax paper? Also, do you place the wax paper on the front of the photo or the backside? Thanks for this great idea!!
While doing a search I found this as I was attempting to put 3 different photos on 3 canvas's. This was such great help and because I don't always follow directions well I put the mod podge on the wax paper but it worked well then proceeded. I used a brush for the image covering well and then went back over with a stenciling brush and pounced the mod podge again. No lines and a truly beautiful look of canvas when dry. It looks like it was ordered. Thank you so much!
This is just so cute, love the ribbon to hang them together.
Pepper this post is amazing! Thanks for linking! I'll be featuring this on BCD on Jan. 24th! Thanks!
Really nice. I did a similar project with image transfers, but this is a nice alternative, with a different look!
Oh man. I am making this for sure. Thanks the the tutorial!
We love this tutorial! We just did a post of a few favorite tutorials and linked back to you and are your newest followers!
www.modernwivelyhood.blogspot.com
Super cute idea...saw you on Modern Wivelyhood! They also featured me with you in their favorite tutorials post :)
Your newest follower, Jessica @ http://myworldmadebyhand.blogspot.com/
Just found you from Modern Wivelyhood...this is a super idea! I'll definitely have to do something like this with pics of my little bit for my mom (and me too, of course!)
Thanks for the tute!
Julie http://picklesandiscream.blogspot.com/
Love it! Just made 2, so easy and they look great! Thanks for sharing.
Going to share this @ www.facebook.com/toriandco
Love this tutorial!! I am soooooooo going to start making millions of these!!
beautiful! I can't wait to try this!
what paint are you using in Step 7?
totally gonna do this.
I have been doing another project with ModPodge and photos and all my photos crackled and the color ran. It was like the top portion of the photo paper separated and went slipping all over the place. It was horrible! Now, I am trying to fix my project which is a bit challenging!
I love working with canvas, though, and have done several very successful projects. They make stunning pieces of art!
awesome! thanks! i've always wondered how i could get photos on canvas without having them printed that way. :)
This is the best tutorial and finished product I've seen yet on this project! Thank you! I'm going to get to work!
I loved this idea, so I tried it today. I don't know what I was really expecting the results to look like (I guess I expected themt o look pretty like yours!) but I didn't really care for how mine turned out. I used colored pictures of the Bahamas (my honeymoon) and put them on the canvases followingyour directions. Only when they dried, they were sort of blah to me! I wonder if the fact that I had the pictures printed on glossy photo paper makes a difference? I'm going to try again with matte paper, and then put the matte Mod Podge on it, to see if it looks more like a painting (which is what I guess I wanted it to look like). Either way, I love this idea! I'm going to keep working at it till I figure out how to pretty it all up!
I love this idea and your tutorial is superb. I'm writing a post about canvas prints and would love to share two of your pictures and a link back to your tutorial. May I have your permission?
Brittany aka Pretty Handy Girl
GREAT tute! Just what a wanted... thanks so much for the clear details and photos of the WIP!
I just did this today, and it turned out awesome. Thank you so much! I can't wait to blog about it. Thank you for an awesome tutorial and a great gift idea!
Hey Ladies! I Love this. I did some canvas photos of my own and gave you some props on my blog. I'd love for you to check them out.Thanks for sharing!
xo
Krista
www.kristasewinspired.blogspot.com
Hi. I would love to do this project for my mother in law for christmas. I'm just wondering if you had your pictures printed in glossy or matte. Also are they black and white or sephia? Any info would be great. thanks so much!
Featuring your great project today on my blog... Thank you so much for sharing!
http://www.the36thavenue.com/2011/11/picture-perfect.html
Love this! I am your newest follower :-)
I"m curious about why you covered the canvas with Mod Podge and let it dry before you added the papers?
Do you need to mod podge over the photo, or can you just use the mp to glue the photo on? I've never used it before, but I'm not understanding the need to glue OVER the photo as well as under it?
Thanks :)
Hi Emma! Thanks for checking out the tutorial. You can definitely just glue the picture on, however it is very hard to do it without getting the Mod Podge anywhere on the photo. I wanted a matte finish on my canvases because if they are glossy you can't see them in certain light or from certain angles. When you Mod Podge over the canvas it completely seals it to the canvas as well as protects it from dust and damage, and honestly it just looks really cool!
Have a great Holiday Season!
Thank you so much for posting this! I've been looking for all over for such an awesome tutorial. This will so be the perfect gift for my mom for Christmas.
I love this! I foun it on pinterest and I am oerjoyed! I put a ink to you on my blog because I thought this was too good not to share! Hope you don't mind! This is it if you were wondering:)
amyscraftbucket.blogspot.com
Thanks a million!
Love this project just finished with three sets. One for each grandma and one for me. Thanks you made this so easy to create.
My black and white pictures seem to turn blue! Of course I tried the homemade mod podge. Could this be the reason and if not how do I keep it from turning blue? Thanks any help is welcomed!
What is the purpose of the paint? Do you paint over the entire photo after modge podge? Did you ever try it without the paint? I really want to do this tonight! I pinned this site to pinterest!!! :) Thanks for sharing
@ROemptyMommy: The paint is optional, and is on step 7. It gives a nice vignette to the photo as well as hides the edges of the photo and scrapbook paper. Thanks for reading!
I did this tonight and my photos ended up with lines across them. Is this the way it is suppose to be? If not can I fix it and how can avoid it on others?
@Amy: I am so sorry that your photos ended up with lines! If the lines are from the Mod Podge, trying to use less next time might help. You can water down the Mod Podge to make it thinner, which in turn makes it easier to apply a nice even coat. You can use a damp (not wet) sponge brush and run it across the dried Mod Podge lines to thin then out. Or, my favorite...apply Modpodge in the opposite direction and you will end up with a grid-like texture similar to a canvas! I hope this helps!
~Pepper
Thanks so much for this tutorial. I'm not very crafty but wanted to try this out. I have a few questions about the pictures. I went to Kinkos to print them off my USB drive and discovered that I didn't know how to go about doing so. Did u use regular printer paper to do this or a special type of paper? Is printing with laser ok? Do I need to make the picture black and white first (they're currently in color) before printing it? I'm sorry for all the questions but in very grateful for your help.
I made coasters this Christmas for the grandparents and they loved them. Maybe I will do this for Mother's Day gifts! How fun!
I tried this today and it was very easy. However, I did encounter a problem. After it was all dry, I noticed the mod podge turned part of my black and white image a shade of purple :/ Have you ever encountered this problem? What went wrong?
Christina, I experienced the same thing! Im not sure why it does that. Ive seen some online that come out great and then I see mine :( Another problem I am having is that since i moved from the desert (cali) to hawaii, My pictures are puckering. I have tried mod podge to glue it down and also adhesive spray. Any solutions??
@Christina and Niki: I am so sorry that happened! There are only two reasons I can think of. The printed picture wasn't a laser print or some of the paint from the canvas (If painted black prior) had a blue base and it came into the mod podge a little. With the puckering, I would try applying a tiny but of mod podge (Under the pucker if you can) and place the canvas face down onto wax paper. Cover with heavy images, directly onto the canvas and the wood, then leave the picture over night. Some if not all of the bubbles or puckering should go away. I hope this helps!
I love this! I have a couple of questions though.
1. Why the first layer of modpodge? The one you apply all over and let dry before adding the sides... Just curious...
2. How do you think this would work with colored photos? I feel like the only tutorials I see are with black and white... Any tips on spongepanting the colored photos or should I just skip that part?
Thanks in advance for your help!!
yes i don't understand the wax paper part. what purpose does the wax paper serve? thank you!
Such a great project! I did this a few months ago with some girlfriends and they turned out so nice! I have it pictured on a mantle post I did today, and added a link to this post.
Thanks so much for sharing!
what kind of paper should the picture be printed on? i have a reg home printer, can i print my own pictures?
wow, what a great tutorial for convert photo to canvas print, i like this post, it too good you have provide here photo tutorial step by step for easy learning, thanks for sharing your experience with us.
canvas prints
what colour is the paint you used at the end?
This craft was made at our latest monthly dinner. I referenced your site on the blog post. Love this idea. It was a big hit at the party!
Check it out the post at www.inviteanddelight.blogspot.com
Hey Pepper
This is such a great project and a wonderful tutorial. I am so doing this. My BFF (who also lives in the Bay Area) is coming to SoCal soon for a visit, and this will be one of our "Must-Do" altered art projects. Thanks for inspiring me!
This looks so great and I am so excited to do one of my own!! However, I am also wondering about the wax paper part....what exactly do I need to do with the wax paper, do I put the picture on it face down or on the back of the picture and then glue it to the canvas?
Quick question...what type of paint should I use for the edges? Do you prefer one over another? Thanks for the awesome tutorial!
Do you find that the mod podge dulls the color of the photograph? I'm working on a similiar project and I did a test strip on another photo and I felt like the mod podge part made the colors less brilliant? I was using the matte finish Mod Podge.
Great result, I love the edges of the canvas in part one, it's so unusual and funky! Makes a canvas look a bit special :)
These are so beautiful! I'm in the process of making one right now for my mom for Christmas! So far it's going good!
Pepper, just wanted to thank you for this easy tutorial! I made a 16 by 20 ad my family & it turned out lovely. I get SO many compliments & people asking me how I did it. Your blog is always my reference! Thanks for making my world a little happier ;)
It looks to me like your photos are sepia - are they? And what color paint did you use, please? I would like mine to turn out as much like yours as possible. Thank you!
~Jeri
Hi - I loved doing this but have run into a slight issue. It's my first time using Modge Podge (matte finish) and it keeps leaving a streaking looking finish on my pictures. Is that what it's supposed to do or am I not using enough?? Please help!
Great article, we've found a really cool effect is taking a single photo and splitting it among three canvases. It makes a very original and stylish piece of decor, its a bit more challenging DIY but totally worth it.
This is fantabulous! Is that a word…oh I don’t care, I like the way it sounds.Oh the wonders of the craft world !!
http://www.rockmywall.co.uk/wall-art-canvas-prints.html
Anonymous: Step #7 is where you apply your paint. You can choose any paint color you wish to use!
Post a Comment